How to put on and remove hearing aids

How to insert hearing aids correctly?
Last update on Apr 16th, 2025

Putting in hearing aids

Wearing hearing aids correctly is essential for both comfort and optimal sound quality. Proper insertion ensures that you receive the best possible hearing experience while preventing issues such as feedback, discomfort, or reduced effectiveness.

In this guide, we will cover the correct methods for inserting different types of hearing aids, as well as troubleshooting common difficulties and maintaining your devices for long-term performance. Whether you are new to hearing aids or looking to refine your technique, following these steps will help you wear your hearing aids with confidence.

What is the correct way to insert a hearing aid?

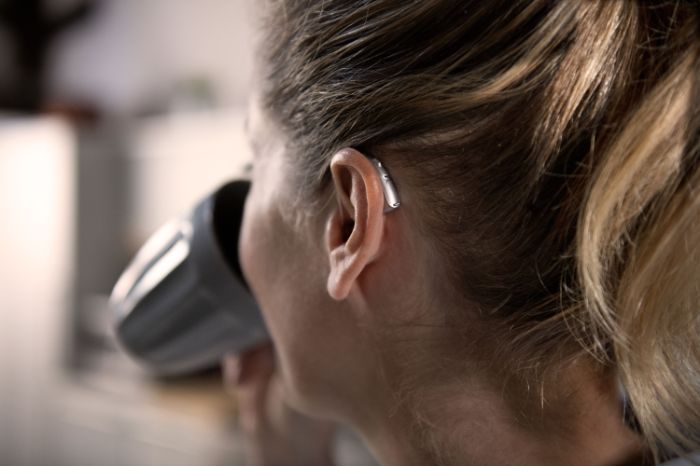
To ensure that the hearing aid works well and is positioned properly, it best to adjust it until the hearing aid sits comfortably in the ear. When wearing behind-the-ear hearing aids, the earmold should be positioned securely so signals can be can clearly transmitted into the ear. Alternatively, when wearing the In-the-ear and CIC (completely in your ear canal) models, the hearing aids must be placed in the ear canal so that the seal does not come loose when the head moves. To properly fit and position your hearing aids, ask your hearing care professional for help in the initial stages and then familiarize yourself at home with the insertion and removal steps.

How to insert in-the-ear (ITE) hearing aids

To properly insert in-the-ear (ITE) hearing aids, you must: 

  • Hold the hearing aid so that the markings are facing up;
  • Gently pull the earmold outward; 
  • Insert the hearing aid into your ear canal, rotating it slightly if necessary, following the natural shape of your ear.

How to put in receiver-in-canal (RIC) hearing aids

To properly insert the receiver-in-canal hearing aids, you must:

  • Place the connection wire between your thumb and forefinger;
  • Gently insert the receiver into the ear canal;
  • Place the device over the earcup, then tuck it behind the ear;
  • Place the receiver in the inner ear cavity.

How to put in behind-the-ear (BTE) hearing aids

To properly insert behind-the-ear (BTE) hearing aids, you must: 

  • Hold the earmold between your thumb and forefinger;
  • Gently insert the tip of the custom-fit earmold into the ear canal;
  • Rotate the earmold;
  • Push the earmold into your ear canal until you feel it is correctly positioned; 
  • Place the hearing aid behind the earcup so that the curve rests on top of the ear.

How do I remove ITE hearing aids?


To properly remove in-the-ear (ITE) hearing aids, you must:

  • Place your thumb behind the earlobe and press to release the hearing aid from the canal; 
  • Grab the protruding hearing aid and remove it.

How do I remove RIC hearing aids?

To properly remove the receiver-in-canal (RIC) hearing aids, you must:

  • Grab the cord at the ear canal opening with your thumb and forefinger.
  • Gently pull the earmold out of the ear canal;
  • Remove the hearing aid.

How do I remove BTE hearing aids?

To properly remove behind-the-ear (BTE) hearing aids, you must:

  • Remove the behind-the-ear hearing aid from behind your ear;
  • Pull the earlobe down slightly;
  • Grab the earmold with your thumb and forefinger and gently twist it outward.

How to insert hearing aid into ear canal

For those using in-the-ear (ITE), receiver-in-canal (RIC), or behind-the-ear (BTE) hearing aids, ensuring a secure fit inside the ear canal is crucial.

To insert your hearing aid properly:

  • Check the orientation – Identify the left (blue) and right (red) markers on your devices.
  • Hold correctly – Position the hearing aid with your thumb and forefinger, aligning it with the shape of your ear.
  • Gently insert – Place the tip of the hearing aid into your ear canal and rotate it slightly to follow the natural contour of your ear.
  • Adjust for comfort – Ensure a snug fit but avoid forcing it in too deeply.
  • Test the positioning – If the hearing aid feels loose or uncomfortable, remove and reinsert it.

What does red and blue mean on hearing aids?

Hearing aids are often marked with red and blue indicators to help users easily distinguish between the left and right devices. The red marking signifies the right hearing aid, while the blue marking indicates the left hearing aid. This colour coding ensures correct placement, which is essential for optimal sound quality and comfort.

Difficulty inserting hearing aid

If you experience difficulty inserting your hearing aid, consider the following solutions:

  • Use a mirror – A visual guide can help align the device correctly.
  • Earwax buildup – Excess earwax can obstruct proper insertion; regular ear cleaning may help.
  • Size and fit – If your hearing aid feels too tight or loose, consult your audiologist for adjustments or custom moulds.
  • Practice – Repeated attempts with guidance from a professional can improve technique.

How to clean hearing aids

Regular cleaning is essential to maintain hearing aid performance and longevity.

Follow these steps:

  • Wipe daily – Use a dry, lint-free cloth to remove debris and moisture.
  • Remove earwax – Use a soft brush or wax pick to clean vents and openings.
  • Check tubing and domes – For RIC and BTE models, inspect for blockages and replace parts if necessary.
  • Avoid water exposure – Keep hearing aids away from moisture and store them in a dry place.
  • Use a drying kit – A hearing aid dehumidifier can help prevent internal damage.

How to remove hearing aid​

Proper removal helps preserve the integrity of your hearing aids, preventing unnecessary wear and tear while ensuring they continue to function effectively for longer. When removing your hearing aids, hold them securely and pull them out slowly to avoid damaging any delicate components. If you experience resistance, gently wiggle the device rather than forcing it out.

Once removed, always store your hearing aids in their designated case. Proper storage is essential to prevent damage from accidental drops, moisture buildup, or exposure to dust and debris. Keeping your hearing aids in a dry, secure place not only extends their lifespan but also ensures they are ready for use when needed.

Hearing aid comfort tips​

  1. The first step is selecting the right fit. Custom-fitted earmolds or domes can help reduce pressure points and ensure a secure but comfortable placement. If your hearing aids feel too tight or cause irritation, consult your audiologist for possible adjustments to improve comfort.
  2. Another crucial factor is gradually increasing wear time. If you are new to hearing aids, start by wearing them for a few hours each day and slowly extend the duration. This allows your ears to adapt and prevents discomfort associated with prolonged use.
  3. Maintaining good ear hygiene is also important. Keeping your ears clean helps prevent irritation and discomfort caused by earwax buildup. Clean your ears regularly, but avoid inserting cotton swabs too deeply, as this can push wax further into the ear canal.
  4. If you experience soreness or pressure points, do not ignore them. Persistent discomfort may indicate an improper fit or the need for a different type of dome or earmold. Your audiologist can make necessary adjustments to improve overall comfort.
  5. Finally, ensure that your hearing aids are properly ventilated. Some earmolds have built-in vents to relieve pressure and promote airflow, making them more comfortable for extended wear. If your hearing aids feel stuffy or create a blocked sensation, ask your audiologist about venting options that might improve comfort.

Hearing aid care: Amplifon assistance

At Amplifon, we are committed to providing exceptional care and support for your hearing aids, ensuring they perform at their best for years to come. Our comprehensive aftercare services include expert guidance on cleaning and maintenance, personalised adjustments to optimise comfort, and professional evaluations to determine if an upgrade may be beneficial.

Regular maintenance is key to extending the lifespan of your hearing aids, and our specialists are here to help with thorough inspections, deep cleaning, and troubleshooting any issues you may encounter. If your hearing aids require fine-tuning or reprogramming, our expert audiologists will make precise adjustments to enhance your listening experience.

Additionally, our team can assess whether your current hearing aids are meeting your needs or if an upgrade could provide better performance and improved features. Whether you need assistance with everyday care or are considering an advanced hearing solution, Amplifon ensures you receive the highest level of professional support tailored to your hearing journey.

Amplifon online hearing test

Ear hair and many other factors can make your hearing less effective. If you have recently started noticing some difficulty hearing well, try our free online hearing test now.

Start the test
Previous
Next

News & Blog

Catch up on the latest news and stories on hearing health.
Learn more

Get support and advice

Book a free hearing test

Book now

Test your hearing online

Take the test

Find your nearest store

Find a store