%20rs.png)

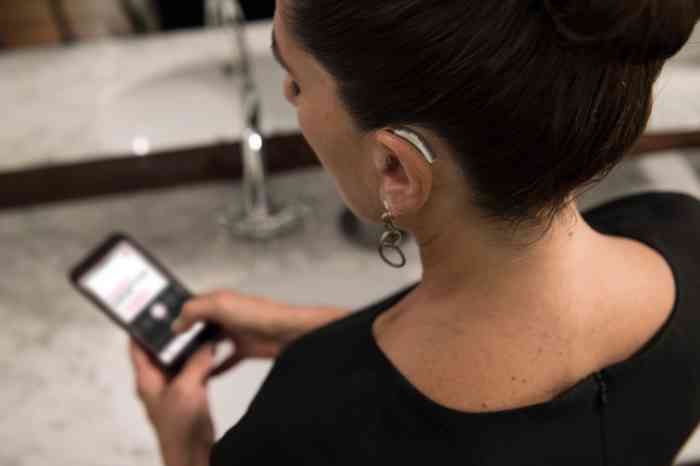
Getting used to hearing aids can take a little time, especially when it comes to inserting them correctly. Whether you're new to hearing aids or just need a refresher, knowing the right technique can make a big difference in comfort and performance. We’ve put together a simple guide to help you place your hearing aids with confidence. If you’re experiencing discomfort or feedback noise, it might be worth exploring adjustments or professional support.
Before putting in your hearing aids, it is important to take a few simple preparation steps. Start by washing and drying your hands thoroughly to avoid transferring dirt, oils, or moisture onto the devices. Clean hands help protect your hearing aids and ensure they work properly throughout the day.
Next, check that your hearing aids are clean and in good condition. Make sure the battery is charged or properly inserted, and confirm that the device is turned off before placing it in your ear. Identifying the left and right hearing aids—usually marked with blue and red indicators—will also help ensure a comfortable and secure fit.
Taking a moment to prepare before inserting your hearing aids can improve comfort, reduce the risk of feedback, and support better sound quality from the start of your day.
Properly inserting your hearing aids is essential for achieving the best sound quality, comfort, and performance. Regardless of the type of hearing aid you use, there are a few universal steps that can help ensure a secure and comfortable fit:
While the exact technique varies depending on your specific model, these general steps apply to most hearing aids. For model-specific instructions, the following step-by-step guides will help you insert your devices with confidence.
Inserting and removing hearing aids correctly helps improve comfort, sound quality, and daily ease of use. Always handle your hearing aids gently and take your time, especially if you are new to wearing them. Rushing the process may cause discomfort or improper placement.
When inserting hearing aids, follow the natural shape of your ear and avoid forcing the device into the ear canal. If the hearing aid does not feel comfortable right away, remove it and try again. For removal, pull the device out slowly and carefully, using the designated removal tab if available.
Storing your hearing aids in their protective case when not in use and keeping them away from moisture and heat will help maintain their performance over time. With regular practice, inserting and removing hearing aids will become a simple and confident part of your daily routine.
Hearing aids come in different styles, and each type requires a slightly different approach for insertion and removal. Understanding the correct technique ensures comfort, prevents damage, and maximizes performance.
RIC (Receiver-in-Canal) hearing aids have a small receiver that sits directly in your ear canal, connected to the main device behind your ear. To insert a RIC hearing aid, start by placing the main body behind your ear. Gently guide the thin wire and receiver into your ear canal, making sure it sits comfortably and securely.
To remove a RIC hearing aid, carefully pull the receiver out of your ear canal while holding the main device behind your ear. Avoid tugging on the wire, as this could damage the receiver. Regular handling with care helps maintain sound quality and extends the life of your hearing aids.
BTE (Behind-the-Ear) hearing aids sit comfortably behind the ear, with an earmold or dome that fits into the ear canal. To insert a BTE hearing aid, place the main body behind your ear first. Then, gently guide the earmold or dome into your ear canal, ensuring it fits securely without causing discomfort.
To remove a BTE hearing aid, lift the device from behind your ear and slowly pull the earmold or dome out of the ear canal. Avoid forcing the device, as this can damage the hearing aid or irritate your ear. Proper handling helps maintain comfort and ensures optimal sound quality every day.
ITE (In-the-Ear) hearing aids are custom-made to fit directly into the outer ear. To insert an ITE hearing aid, hold the device with the battery door or removal tab facing outward. Gently slide it into your ear, allowing it to settle snugly within the ear’s contours.
To remove an ITE hearing aid, carefully grip the edges or use the removal tab to pull it out slowly. Never use excessive force, as this can damage the device or your ear. With regular practice, inserting and removing ITE hearing aids becomes a smooth and effortless part of your daily routine.
IIC (Invisible-in-Canal) hearing aids are designed to sit deep inside the ear canal, making them nearly invisible. To insert an IIC hearing aid, use the small insertion handle or tab provided. Gently slide the device into your ear canal until it rests snugly. It should fit comfortably without causing pressure or discomfort.
To remove an IIC hearing aid, carefully pull on the removal handle or tab, using slow and steady motion. Never force the device out, as this could damage your ear canal or the hearing aid itself. With practice, inserting and removing IIC hearing aids becomes quick and simple, allowing you to enjoy discreet and natural hearing every day
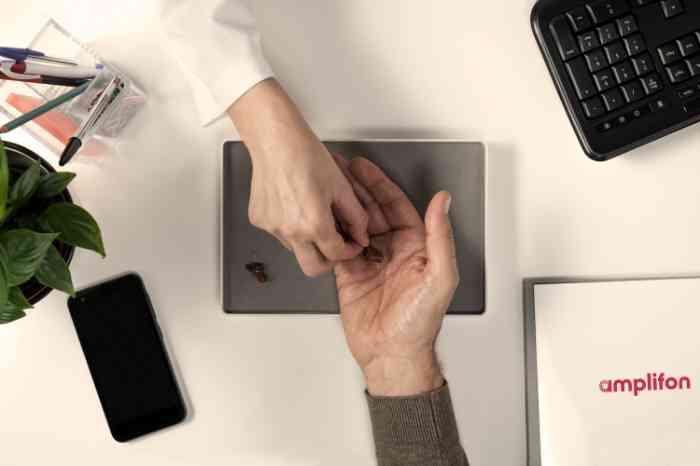
Hearing aid insertion tools can be used for individuals who have limited dexterity, arthritis, or reduced finger strength. These tools are designed to make the process of inserting and removing hearing aids easier, safer, and more comfortable. Common insertion tools are:
Always consult your hearing care provider before using any tool or product to ensure it’s compatible with your device and safe for your ears.
Amplifon offers a wide variety of hearing aids from major manufacturers. Find out more about all types of digital hearing aids: invisible, BTE, RITE and ITE.
Even with practice, many users experience challenges when inserting their hearing aids. Here are some of the most common issues:
Even with the right type of hearing aid, incorrect insertion can affect sound quality and comfort. Common signs include whistling or feedback, unusual pressure or discomfort in your ear, and distorted or muted sound. If you notice any of these issues, remove the device and reinsert it carefully, following the instructions for your specific hearing aid type. Persistent problems may require a hearing care professional to check the fit and settings, ensuring optimal hearing every day.
Our experts will understand your hearing difficulties and offer a solution that works for you.

A proper fit is key to wearing hearing aids comfortably throughout the day. Take your time when inserting and removing your devices, and ensure the dome, earmold, or receiver tip matches the size of your ear canal. Small adjustments with the help of an Amplifon professional can make a big difference in comfort and sound clarity. Remember, a well-fitted hearing aid not only feels better but also improves performance and reduces the risk of feedback.
Proper storage and maintenance help your hearing aids last longer and perform at their best. Always keep your devices in a protective case when not in use, away from heat, moisture, and direct sunlight. Remove batteries if you do not plan to use the hearing aids for an extended period, and avoid leaving them near water or in humid environments.
Regular maintenance includes wiping your hearing aids with a soft, dry cloth, checking for wax or debris, and using any cleaning tools provided by your hearing care professional. For extra care, consider using a hearing aid dehumidifier overnight to remove moisture and protect internal components. With consistent storage and maintenance, your hearing aids will deliver clearer sound, stay comfortable, and last longer.
Cleaning your hearing aids regularly is essential to keep them working properly and extend their lifespan. After removing your devices, use a soft, dry cloth to wipe the outer surface. Avoid using water, alcohol, or cleaning solutions, as moisture can damage the electronics.
For earmolds, domes, or receiver tips, gently remove any earwax or debris using a soft brush or the cleaning tools provided by your hearing care professional. Check the microphone and receiver openings to ensure they are clear, which helps maintain optimal sound quality.
Store your hearing aids in their protective case when not in use, ideally in a dry, cool place. Regular cleaning not only preserves the performance of your devices but also supports hygiene and comfort, making your daily hearing experience clearer and more enjoyable.
Sometimes, professional support is necessary to maintain your hearing aids and protect your ears. Contact an Amplifon hearing care professional if you experience persistent discomfort, recurring feedback, sudden changes in hearing quality, or any device malfunction. Regular check-ups help ensure your hearing aids remain in top condition, giving you clear, natural sound and peace of mind.
It depends on the model:
Automatic-on models: Many modern hearing aids, especially rechargeable ones, turn on automatically when removed from the charging case. In this case, you can insert them directly without needing to press any buttons.
Manual-on models: If your hearing aid has a manual on/off switch, it's generally recommended to insert the device first, then turn it on. This helps avoid feedback (whistling) that can occur if the device is on while outside the ear.
The depth of insertion depends on the type of hearing aid:
Behind-the-Ear (BTE) with earmold or dome: The earmold or dome should be inserted just deep enough to create a secure seal in the ear canal. It should feel snug but not cause pressure or pain. The outer part of the mold should sit flush with the bowl of your ear (concha).
Receiver-in-Canal (RIC): The receiver (speaker) with its dome should be inserted fully into the ear canal, so the dome is not visible and the wire lies flat against the skin. A proper seal is important for sound quality and to prevent feedback.
Completely-in-Canal (CIC): These are designed to sit deep inside the ear canal, almost entirely out of sight. They should be inserted until the outer faceplate is flush with the opening of the ear canal, but never forced. If it doesn’t go in easily, remove and try again at a slightly different angle.
The Amplifon blog is our place to explore ideas and themes of interest. For professional audiology advice, please contact your local clinic for a consultation.